
In the midst of the magic of holiday preparations one activity at the very tip-top of my list is wreath-making. Pruning and gleaning from the trees in our yard, gathering armfuls of scented branches, snipping and bundling, wrapping and tying, and sticky, pricked little fingers...oh yes I love it all!
The first wreaths made it out of here destined for the doors of two of my favorite ladies just in time for Thanksgiving. My fingers have been positively itching to be making more for our own home. It's actually quite simple. Honest. I wish I could gather you around my picnic blanket filled with greens and spend the afternoon making wreaths, chatting, and basking in the season together. Alas...you are there and I am here. So today I bring you the simplest wreath instructions ever. No special tools or techniques....just easy peasy wreaths!
To be totally and brutally honest I have no idea where the wreath form that I carefully packed to make sure I had it ready for the holidays. I couldn't stop from making wreaths without my form though...so I improvised! So here we go...
How to make a wreath...as simple as it gets.
Materials:
~Bits of greenery. (I gleaned branches from the several different types of evergreens on our property. I love a variety of greens in my wreaths, but all of the same variety is very beautiful also.)
~Garden Snips.
~Your very least favorite, but sturdy, yarn. Cheap acrylic is great...easy to come by and tough to break.
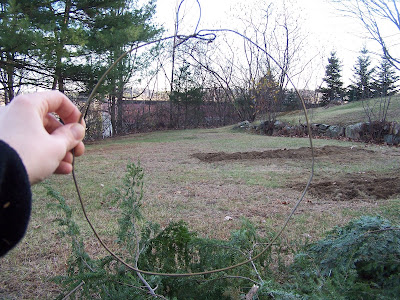
~Wire coat hanger.
1. Start by gathering your greens and snipping them into small sprigs (~6" long). I like to have mine sorted into piles by variety...but a big jumble works too.


2. Bend your wire coat hanger into a circle, twisting the hook so it doesn't stick up quite so high and makes a good loop for hanging your wreath.
3. Gather a little bundle of greens. It's very difficult to tell you how many you'll need. You'll really just need to test it out and see what you like. Imagine your bundle as a small segment of wreath and decide if you like how wide and full it is. Increase or decrease your bundle as needed.

4. Snip a ~24" piece of yarn and tie one end to the hook on your wreath frame. Place your bundle on the frame and wrap your yarn tightly around it. Not so tight that you're breaking the sprigs, or the yarn, but tight! Tie off the yarn but don't cut it.

5. Gather another bundle of greens and place it on the wreath form so that it overlaps the first bundle. Again, you'll have to decide how much you want it to overlap. You will, of course, want the yarn to be completely covered. The more that the bundles overlap the fuller your wreath will be...the more greens you will need too!

6. Once your bundle is in the right placement for your tastes use the yarn you wrapped the fist bundle with ant wrap it tightly, with the same method you used on the first.

7. Can you see your wreath taking form...kind of...! Repeat these same steps over and over again until the wreath is completely filled in, adding more yarn as needed. The last bundle you will simply tuck under your first bundle.

And ta-da!!!! You've made a wreath. You can embellish to your hearts content with pine cones, ribbons, and all sorts of holiday bits and bobs.

If she could have her way every embellishment imaginable would adorn every wreath!!

Happy wreath making friends!


